
Measure before buying parts
Sketch the house, walks, lawn rectangles, beds, trees and water connection. Mark dimensions and slopes. Measure static pressure, then determine usable flow while maintaining the operating pressure required by the selected heads. An open-hose bucket test alone does not prove that flow will remain available at sprinkler pressure.
Water supply, pipe friction, elevation and backflow devices all affect pressure. Use the nozzle chart and pipe-sizing guidance for the products you select. The calculator below is a planning estimate; it does not size the water connection or certify pressure at the farthest head.
What each part does
| Part | Its job |
|---|---|
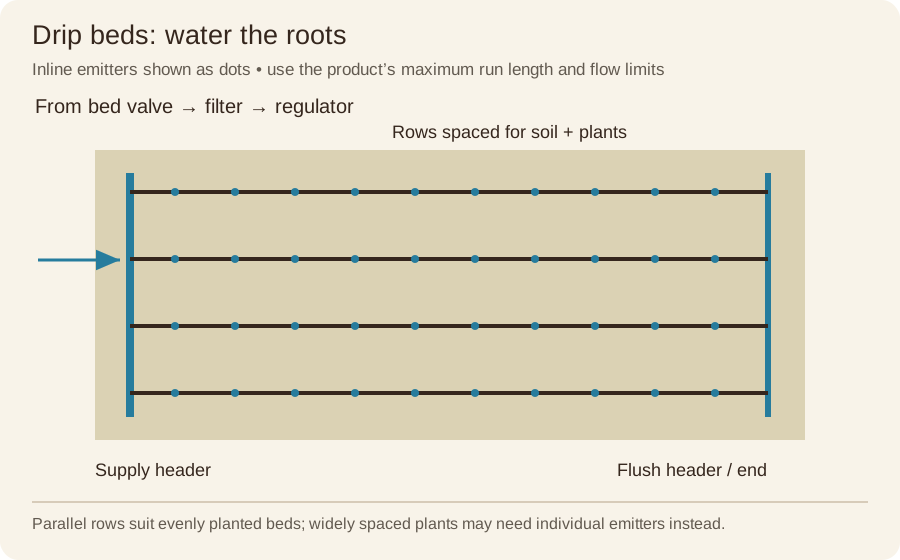
| Controller / timer panel | Sends a low-voltage signal to each zone valve according to its schedule. |
| Shutoff and approved backflow assembly | Isolate the system and protect drinking water. Device type and installation follow the water provider’s requirements. |
| Main line | Carries supply water to the valve manifold; it may remain pressurized. |
| Valve box and manifold | Keep zone valves protected and accessible; one valve controls each zone. |
| Lawn lateral lines and heads | Distribute water to pop-ups or rotors in one lawn zone. |
| Bed filter, pressure regulator and dripline | Keep emitters clean and at their rated pressure, then water the plant roots. |
| Sensor, flush ends and winterization access | Help avoid watering in rain and allow maintenance. |
Lay out sprinklers for even coverage
- Choose one compatible head family per zone. Do not mix ordinary sprays, rotors and drip on the same valve. Use matched-precipitation nozzles and the proper pressure-regulated bodies.
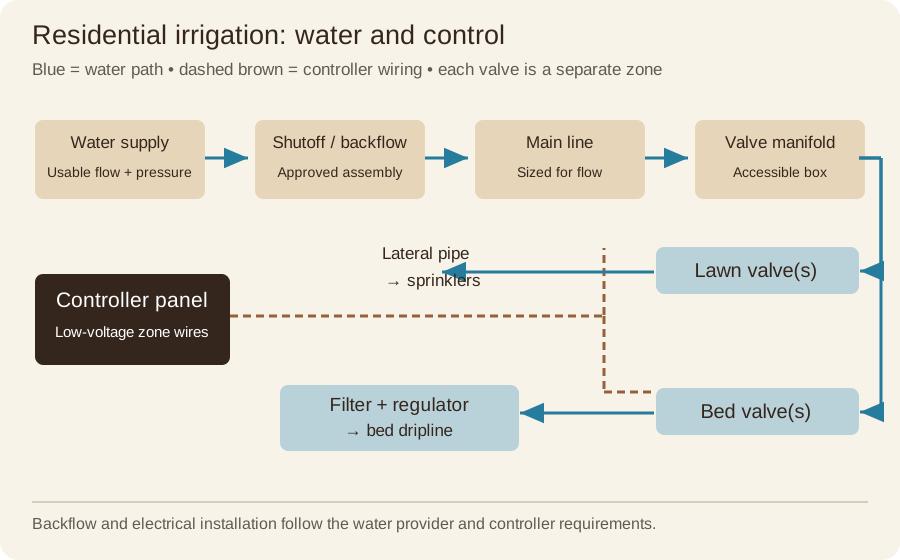
- Start at corners. Set quarter-circle coverage at outside corners, half-circle coverage along boundaries and full circles where needed inside. Aim water away from paving and walls.
- Use head-to-head spacing. The throw of one head should reach the next head at its actual operating pressure. If the effective radius is 15 feet, spacing should generally be no greater than 15 feet—not 30 feet. Wind or obstacles may require closer spacing.
- Fill the middle. Wide lawns need interior rows. Narrow strips and irregular shapes often need strip nozzles or a custom layout. A rectangular grid is only a starting pattern.
- Add up flow. Use the selected nozzle’s flow at each arc and pressure. Split the heads into zones that remain within the usable supply and have similar sun and watering needs.
Plan drip irrigation for beds
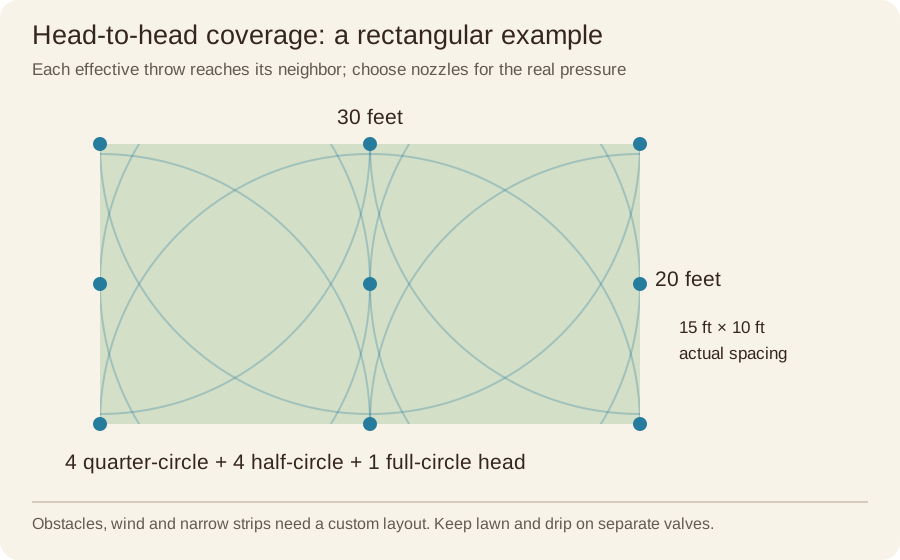
Keep beds on separate valves from lawn sprinklers. Group thirsty annuals separately from established drought-tolerant shrubs where their schedules differ. Choose inline dripline for fairly even planted beds, or individual emitters for spaced plants. New trees may need several emitters around the root ball, moving outward as they grow.
- Choose emitter flow and spacing. Use plant layout, soil and the manufacturer’s wetting pattern. Sandy ground often needs different spacing from loam or clay.
- Add filtration and regulation. Select the filter rating and pressure regulator required by the drip product. Confirm the regulator’s minimum and maximum flow work with the zone.
- Lay supply and flush headers. Run parallel laterals or planned emitter branches. Keep each run within the product’s length limit at the selected pressure and slope.
- Secure and test. Stake the tubing, flush debris before closing ends and check actual delivery. Cover only as the product allows and leave flush points accessible.
Install the system in order
- Mark lines and call 811. Include private locates and protect existing roots. Lay out valve access and sleeves under future paving.
- Have the water connection and backflow arranged. Use the required plumbing professional, permits and testing. Do not connect irrigation directly to drinking water without the approved protection.
- Trench and install pipe. Depth, pipe class and bedding follow the selected system and local conditions. Keep dirt out, make joints using the correct fittings and observe solvent-weld curing instructions.
- Build the valve manifold. Provide room to remove valves and service fittings. Set the box on suitable support without loading the pipe. Label each zone.
- Mount the controller. Follow indoor/outdoor rating and mounting instructions. Have mains-voltage work done appropriately. For a conventional 24-VAC system, connect the common and separate station wires as the manufacturer specifies, with waterproof field connectors.
- Flush, fit heads and pressure-test. Clean lines before fitting nozzles. Put heads at the correct finished turf level, use suitable swing connections and check each zone before backfill.
- Program by zone and test coverage. Use catch cups for lawns and soil checks for beds. Adjust run times for season, rain and plant establishment.
Use the zone and parts calculator
Add separate lawn areas and drip beds. Enter usable flow at working pressure, head spacing, nozzle flow and tubing specifications. The output separates lawn and bed zones, lists planning quantities and flags rows or heads that cannot run within the entered capacity.
Use your own measurements and adjust the product assumptions before ordering.
Open the irrigation calculator →Maintenance checks
- Look for a head stuck low, a broken riser or an emitter buried beneath roots.
- Clean filters and flush drip lines as specified.
- Reduce watering in cool/rainy weather; do not use the same schedule year-round.
- Keep a zone map and winterize the system appropriately before freezing.
Further reading & product instructions
Residential resources used for these explanations. Follow the instructions for the product you actually choose.